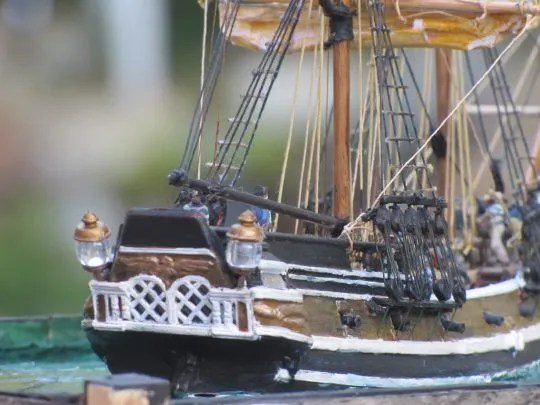
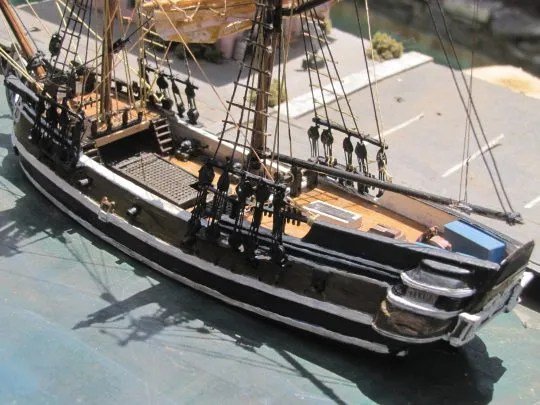
The Black Falcon’s transom was flat as a board. Phineas Caswell needed stern windows. A trip to the Lego Store in Glendale solved both problems for about three dollars.
The transom on the original Black Falcon is flat like nobody’s business. Flat, like the design money for designing the kit ran out immediately aft of the ship’s wheel.
In my novel The Diary of Phineas Caswell, the 12-year-old protagonist spends quite a bit of time in the aft cabin of the Kathryn B, a merchant brig rather based on Aurora’s Black Falcon model kit. Except that the Kathryn B had big windows across her stern, not the boarded up, sterile transom of the Black Falcon.
One evening I found myself in the Lego Store in the Glendale Galleria, a massive, three-story mall built in a time when those were the wave of the future, rather than the brick-and-mortar reminders of who we once were.
In that Lego store, you could buy oodles of individual parts. I picked up a tub of their little gold-colored castle windows, thinking that someday, someday I would find a use for them.
Yes, they’re ugly, and a little cockeyed. Kind of adds to the charm? Maybe?
In the day, say the early 1700’s, plate glass was virtually non-existent. Glass that was affordable for shipwrights, shop owners, and the small tavern came in little shards and pieces. Thus, the stern windows would have been mullioned affairs. Even so, each of the panes in the Black Falcon‘s windows would be around 18×18 inches – not cheap.
As long as we’re looking astern, the corner pieces hide my crude craftsmanship at the corners of the original transom. They come from the ends of a balcony on the Soleil Royale.
The stern lanterns came from a Lindberg’s Captain Kidd Pirate Ship kit. If you hack away the brown plastic lantern lens and replace it with a craft bead, it looks pretty cool. Those hide the crummy craftsmanship of the balconies.
So, there you have it. A super easy, super quick modification, all thanks to Legos. Thanks, Lego!
Tales of the Black Falcon is part of the John D Reinhart content family. Writer, illustrator, videographer, and accidental filmmaker — find the whole story at JohnDReinhart.com.
Coffee stir sticks, CA glue, wood stain, and an unreasonable amount of sanding. Here’s how to replace the Black Falcon’s plastic deck with a real wooden one that actually looks like a ship.
The Black Falcon model kit comes with an immensely busy plastic deck. It’s all one piece, from stem to stern, and features every possible piece of furniture, from pin rails to coils of rope, already molded onto it. The only things missing are the guns. Because it’s a model kit from the early 1960’s, the deck seams are horrifically wide, and astonishingly deep. Okay, that’s a little over the top, but they’re not very realistic.
I never intended to model wooden decks, but stumbled upon this method, and realized it just might work.
All you need for this project is a few hundred coffee stir-sticks, some sandpaper, and a bottle of CA (cyano-acrylic, or super) glue. Oh, and some wood stain.
You’ll want the coffee stir-sticks instead of Popsicle sticks because they’re thinner, narrower, and longer. The thinness is more to scale for the Black Falcon. You’ll appreciate the narrowness in a moment. And the length makes it easy to build the correct length decks.
The process is stunningly easy: glue two sticks together, flat to flat. Be careful with the glue: put three dots on one piece, each an inch from the other. Put the second stick on top and hold them firmly together for the full thirty seconds, until the glue sets.
And that’s it. Add another stick, and then another, until you’ve built the width of the deck. Well, that’s not quite it.
Measurements
The Black Falcon has an opening in the main deck. Flip the plastic deck over and measure the length and width of the opening. Measure the distance between the edge of the deck and the side of the opening (A). Measure the distance between the forward edge of the deck and the forward edge of the opening (B). And, measure the distance from the aft end of the opening to the aft end of the deck (C). As long as we’re at it, measure the length of the entire deck (D). It seems complex, but it’s really not.
Assembly
So, make a raft of sticks that’s as wide as measurement A and as long as measurement D. Now make another one just like it. These are the side pieces.
Now, make a mini-raft out of sticks that are as long as measurement B and the width of the opening.
Now make a mini-raft the same length as measurement C and the same width as the opening.
Match the end of one mini-raft to one end of a side piece, and glue it on. Match the end of the other mini-raft to the other end of the side piece and glue that on. Now glue the other side piece to the two mini-rafts.
Do the same thing for the skylight in the halfdeck.
To get the sides of your new deck into the right shape, set the old plastic deck on top of your beautiful, genuine wooden deck. Match the openings, and use a Sharpie to draw the plastic outline onto the wood.
Sanding
Time to start sanding. And sanding. And sanding. Sand the sides first, to achieve the right shape. You’ll break off pieces of the deck as you go. Not to worry. Just glue them back on.
Now it’s time to sand the top of the deck. Be aggressive here. You want to get the deck absolutely smooth, eliminating the rises and pits between the sticks. Plus, you want to sand off the wax coating on the sticks.
When you’re done sanding, you have a gorgeous wooden deck to make the Black Falcon even more beautiful. However.
However, your deck is monstrously thick. Like three scale feet thick! Thank goodness we’re using skinny little coffee stir sticks – Popsicle sticks would make them around 5 feet thick!
You can fix it in a couple of ways. One way is to put a bulkhead at the ends of the deck. This works great for the forward end of the halfdeck and aft end of the foredeck.
But it won’t work for the after end of the halfdeck because of the rakish angle of the transom.
And, if you choose as I did to leave the space under the foredeck open, you’ll need to lose some thickness.
To hide the hideousness, aggressively sand the underside of the deck. Aggressive, so that it approaches a scale thickness. When you start to wonder if the coffee stir sticks can withstand much more abuse, it’s time to stop. I covered the remaining thickness with a simple wooden batten.
Coloration
Your decks now have a lovely offwhite color, which is very probably accurate if you’re modeling a navy ship: they holystoned their decks daily to keep them clean and to give the huge crew something to do.
But the Black Falcon be a pirate ship, don’tcha see?, so she probably didn’t get that much care. I stained mine with some old wood stain I found in the paint cabinet: go easy as a little goes a long way.
Furniture
Here’s where things get a tad dicey. Some of the features on Black Falcon‘s deck are simply useless: those boxes around the base of the masts, for instance. Those are meant to be pin rails, but it was too costly to make them separate parts, so they became planter boxes.
But some of the details are cool, like that sliding hatch on the quarterdeck, and that nice hatch out on the foredeck. Those I cut from the plastic deck and sanded down until they could sit flat on the wood deck.
The box that supports the ship’s wheel is not right, but looks kind of cool back there on the quarterdeck. I stole that, too.
Oh, and there are two big issues you’ll have to deal with. They’re on either side of the wheel. The plastic deck has a sort of flange molded there, but that’s so wrong as to be illegal. However, the flanges covered the space left open by the molding for the quarter gallery roofs.
I found those cool blue lockers in the Soleil Royale kit, and the problem was solved.
If you’re the patient type, you could drill out the windows in the skylight and steal that, too. I’m not, so I made my own out of coffee stir stick pieces and the top of the Soleil Royale’s chicken coop.
The Fit
As you can image, the sides of the Black Falcon are grooved to handle a deck that’s 1/16 of an inch thick. Ours is considerably more robust.
The original kit has you glue the hull halves together, and then fly the deck in from above. It’s not for the faint of heart, as you have to seriously pry the after ends of the hull quite a ways to get it to fit.
Our new decks don’t quite live in that airspace. No, we need to do it the very hard way.
First, don’t glue the hull halves together. If yours is already in that state, you could pry them apart, cut them apart, or, as I did, opt for a waterline model.
Shear off, sand down, and otherwise remove most of the alignment pins and such on the inside of the hull halves. I say most, because you need to leave yourself some degree of guidance for the location of our new deck.
Sand and sand and sand some more, until the fit is really very good. Temporarily tack each deck to the starboard hull, and then test fit the port side. It won’t fit, because nothing ever does on the first try.
But keep going, sanding and sanding, and eventually you’ll get a good fit. Permanently stick the decks to the starboard side, and then attach the port side.
And you’re done! Oh, she’s a beauty, eh, mate?
Tales of the Black Falcon is part of the John D Reinhart content family. Writer, illustrator, videographer, and accidental filmmaker — find the whole story at JohnDReinhart.com.